After making the pink floral pillow for my granddaughter, I was approached by my oldest grandson with a request. Could I make him a red angry bird pillow? Whoa! I had a pattern for the flower pillow, but there is no pillow tutorial that I could find for an angry bird pillow. At first, I thought I could make a round (basketball-type) pillow, but if my grandson actually wanted to cuddle his pillow I thought a different pillow would be better. This is what I came up with...

A tutorial follows...
I would call this an intermediate sewing project.
You will need to know how to machine applique.
Materials:
1/2 yd red fleece
black felt
white felt
yellow felt
pink felt
Matching thread
polyester fiberfill
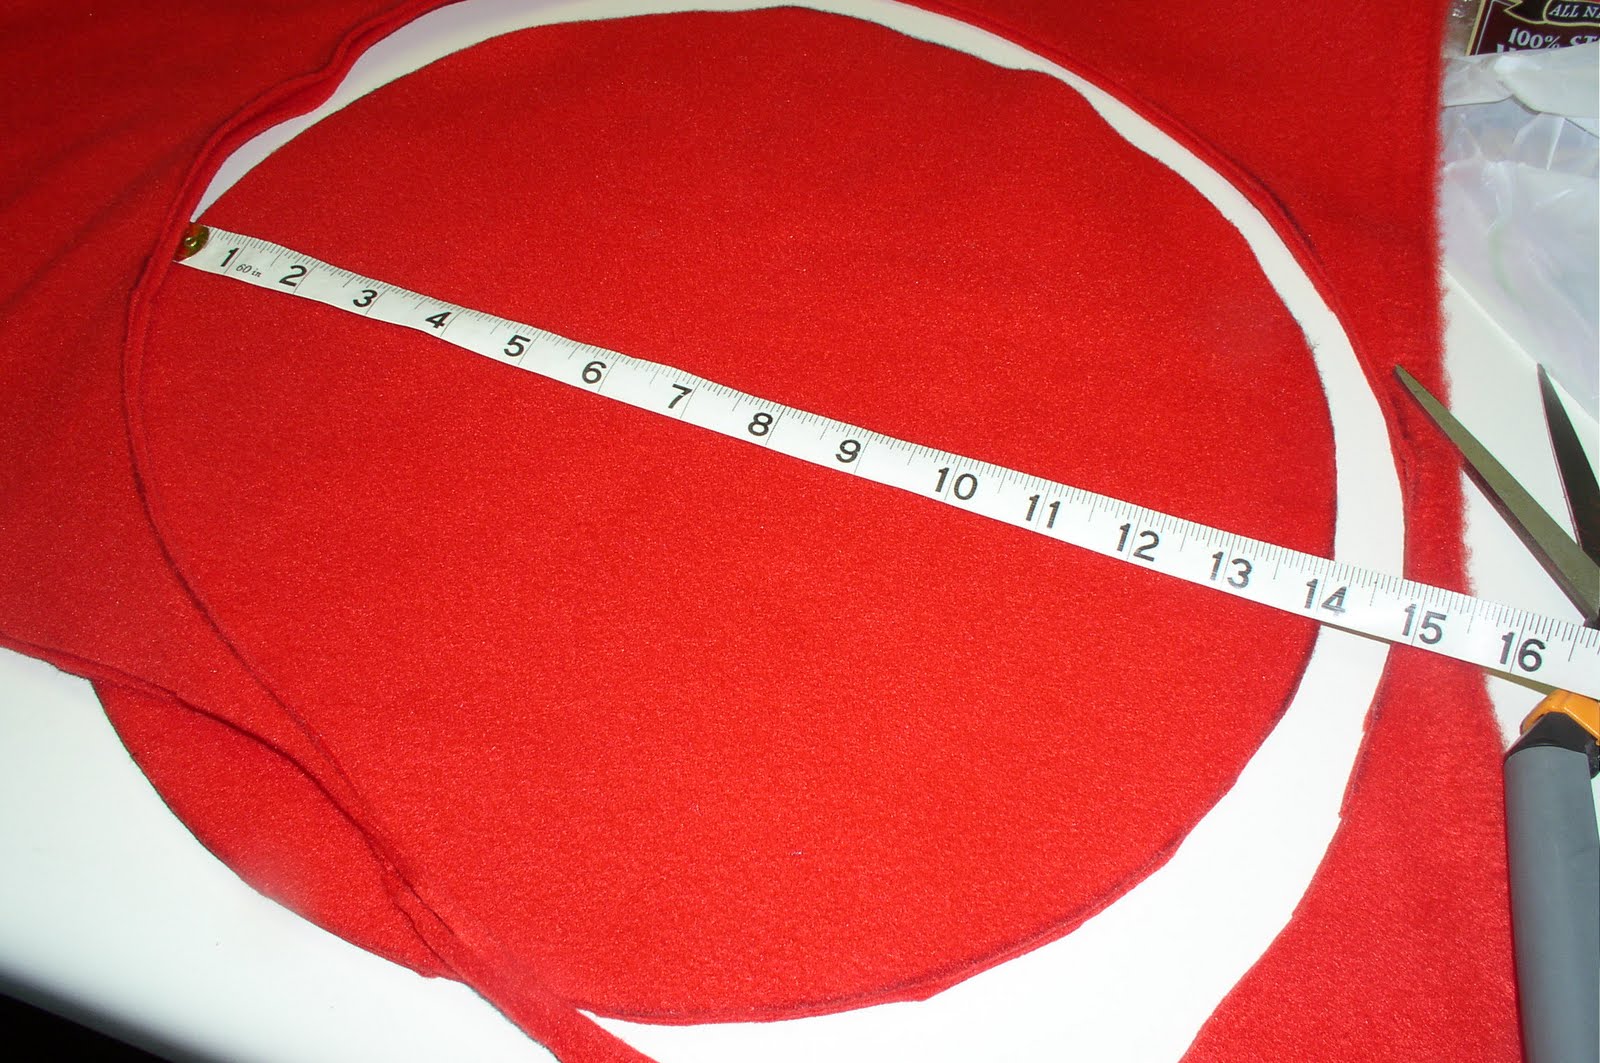
I used a tray to trace a circle for the base pillow.

I then cut out 2 circles. My circle was a 14" diameter. I then cut a 4" strip that was cut the width of the fabric (approximately 58" long).

I then traced the tray onto a large piece of paper (in this case, a roll of paper tablecloth) and cut it out. I needed this for the white for the body of the red bird. I placed the tray on top of the cut out circle and then placed the tray on the pattern so that the tray came up about 1/3 of the way up the circle and traced and cut it out.

I'd like to say that I had a scientific method of making the rest of the pieces, but I didn't. I just took some paper and with scissors and a pencil I kept trying until I got the pieces right.

I laid out the face and tweaked it until it looked right.

I marked the placing of the bill on the eye shape. This way I didn't have to applique the entire eye. I was afraid that the black stitches would show through the yellow of the beak.

Starting with the white eye shape, I began machine appliqueing the features of the face. I am not going to explain machine applique because it would be impossible with still photos. I found several tutorials on Youtube, so you can search "Machine Applique tutorial" there. I did not use a fuseable web instead I took different pieces of scrap paper and placed them between the fleece and the sewing machine.

The eye piece was pinned in place and sewed on.

I then sewed the eyes in place with that same satin stitch and don't forget the paper between the fleece and the sewing machine.

Here is the finished product with the thread unclipped.

Next came the totally angry eyebrows.

Here I am pulling off the paper I've sewn on the back.

This is what the back looks like at this point.

I then appliqued the body of the bird that was not going to be in the seam and simply sewed the white that would be in the seam. I sewed on the bottom beak (pink). Lastly, I sewed the top beak, but left an opening so that I could stuff the beak lightly.

After stuffing the beak, I finished appliqueing the beak on. And this is the finished face.

The red feathers at the top of the head were made of 2 sort of mitten shape pieces of fleece. I sewed them together and turned it inside out.

I also sewed a small zigzag line from the crook of the mitten toward the opening, though not all the way. I stuffed both the "hand" and the "thumb" of the feather and sewed it onto the 4" end of the long strip of fleece.

This next step is tricky. Place the length of 4" fleece so that the "thumb" of the feather is at the top. Take the 4" fleece with the feather and fold back 1/2". You should see the fold and the complete feather. Place the fold at the top of the bird's face. You will now be making a gusset for the pillow. It is a piece of fabric sewn on one side to the front and the other side to the back of the pillow allowing the pillow to gain thickness.

Start pinning the length of the fleece around the entire outside of the bird's face. I started this on the left side.

I then sewed the length of the fleece around the face. PLEASE NOTE: Leave about 1/2" - 1" unsewn on each side of the place where the seam that closes up the gusset. PLEASE ALSO NOTE: There will be around 10" of leftover 4" wide fleece when you are done sewing.

It is now time to sew the long 4" piece together. You now need to put the two 4" pieces of the gusset together. You will match them together so that the gusset piece fits nicely around the face and you must allow for a seam allowance. I used about 1/2" seam allowance. I pinned and sewed that seam and then cut off the excess of the gusset material.


This is the seam after it is completed.

It is time to sew the back onto the gusset.

Pin the back onto the gusset. The right sides of the fabric should be inside.

Sew together leaving a 4" opening.

Stuff your bird to your desired stiffness.

Pin and slip stitch or machine sew the opening.

The finished project...

The pillow was an absolute success. My grandson loved it!
 A tutorial follows...
I would call this an intermediate sewing project.
You will need to know how to machine applique.
Materials:
1/2 yd red fleece
black felt
white felt
yellow felt
pink felt
Matching thread
polyester fiberfill
I used a tray to trace a circle for the base pillow.
A tutorial follows...
I would call this an intermediate sewing project.
You will need to know how to machine applique.
Materials:
1/2 yd red fleece
black felt
white felt
yellow felt
pink felt
Matching thread
polyester fiberfill
I used a tray to trace a circle for the base pillow.
 I then cut out 2 circles. My circle was a 14" diameter. I then cut a 4" strip that was cut the width of the fabric (approximately 58" long).
 I then traced the tray onto a large piece of paper (in this case, a roll of paper tablecloth) and cut it out. I needed this for the white for the body of the red bird. I placed the tray on top of the cut out circle and then placed the tray on the pattern so that the tray came up about 1/3 of the way up the circle and traced and cut it out.
 I'd like to say that I had a scientific method of making the rest of the pieces, but I didn't. I just took some paper and with scissors and a pencil I kept trying until I got the pieces right.
 I laid out the face and tweaked it until it looked right.
 I marked the placing of the bill on the eye shape. This way I didn't have to applique the entire eye. I was afraid that the black stitches would show through the yellow of the beak.
 Starting with the white eye shape, I began machine appliqueing the features of the face. I am not going to explain machine applique because it would be impossible with still photos. I found several tutorials on Youtube, so you can search "Machine Applique tutorial" there. I did not use a fuseable web instead I took different pieces of scrap paper and placed them between the fleece and the sewing machine.
 The eye piece was pinned in place and sewed on.
 I then sewed the eyes in place with that same satin stitch and don't forget the paper between the fleece and the sewing machine.
 Here is the finished product with the thread unclipped.
 Next came the totally angry eyebrows.
 Here I am pulling off the paper I've sewn on the back.
 This is what the back looks like at this point.
 I then appliqued the body of the bird that was not going to be in the seam and simply sewed the white that would be in the seam. I sewed on the bottom beak (pink). Lastly, I sewed the top beak, but left an opening so that I could stuff the beak lightly.
 After stuffing the beak, I finished appliqueing the beak on. And this is the finished face.
 The red feathers at the top of the head were made of 2 sort of mitten shape pieces of fleece. I sewed them together and turned it inside out.
 I also sewed a small zigzag line from the crook of the mitten toward the opening, though not all the way. I stuffed both the "hand" and the "thumb" of the feather and sewed it onto the 4" end of the long strip of fleece.
 This next step is tricky. Place the length of 4" fleece so that the "thumb" of the feather is at the top. Take the 4" fleece with the feather and fold back 1/2". You should see the fold and the complete feather. Place the fold at the top of the bird's face. You will now be making a gusset for the pillow. It is a piece of fabric sewn on one side to the front and the other side to the back of the pillow allowing the pillow to gain thickness.
 Start pinning the length of the fleece around the entire outside of the bird's face. I started this on the left side.
 I then sewed the length of the fleece around the face. PLEASE NOTE: Leave about 1/2" - 1" unsewn on each side of the place where the seam that closes up the gusset. PLEASE ALSO NOTE: There will be around 10" of leftover 4" wide fleece when you are done sewing.
 It is now time to sew the long 4" piece together. You now need to put the two 4" pieces of the gusset together. You will match them together so that the gusset piece fits nicely around the face and you must allow for a seam allowance. I used about 1/2" seam allowance. I pinned and sewed that seam and then cut off the excess of the gusset material.

 This is the seam after it is completed.
 It is time to sew the back onto the gusset.
 Pin the back onto the gusset. The right sides of the fabric should be inside.
 Sew together leaving a 4" opening.
 Stuff your bird to your desired stiffness.
 Pin and slip stitch or machine sew the opening.
 The finished project...
 The pillow was an absolute success. My grandson loved it!